

How To Save Background As Transparent In Photoshop
Creating a transparent background for your production epitome in Photoshop opens upwardly a wide range of eye-catching brandish options for your featured products. For example, a transparent background gives y'all the power to place your product against a background that dynamically changes colors. On responsively designed sites, a featured product with a transparent background tin can interact differently with its background depending on the user's screen size.
Your website'south logo files should likewise be created with transparent backgrounds and then that yous tin place the logo anywhere on your site, regardless of the page'southward background color.
Using Photoshop to create a transparent background, so saving the file in the appropriate spider web-ready format, is remarkably piece of cake in one case you know what you're doing. We'll walk yous through this uncomplicated process in the tutorial below.
How to create a transparent background for a product image in Photoshop
- Brand your image into a layered file
- Create your selection
- Delete the groundwork
- Save your image in the proper spider web-ready format
- Relieve your file
Stride ane: Make your epitome into a layered file
Open your product image in Photoshop. Virtually probable, it'll exist in a JPG format. For this example, we'll use an image of a wristwatch taken against a white background.
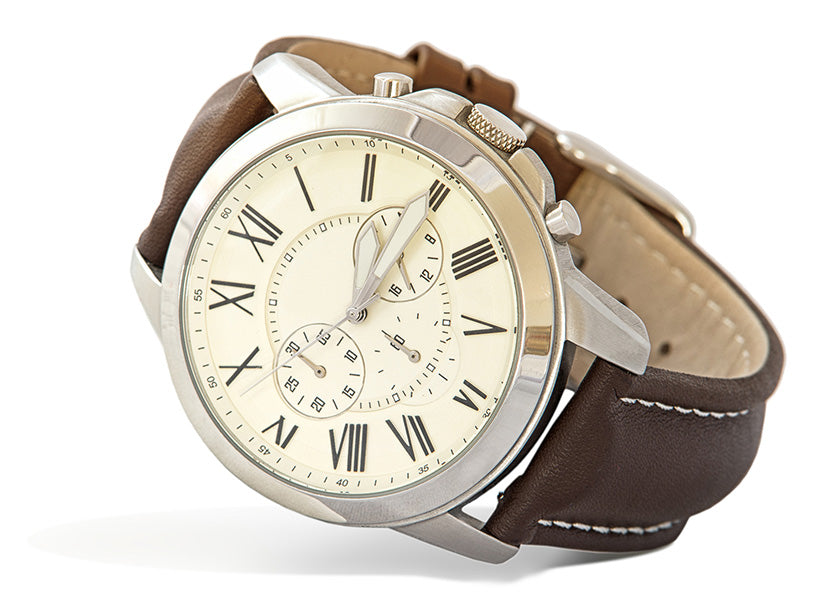
Source: devnenski / Adobe Stock
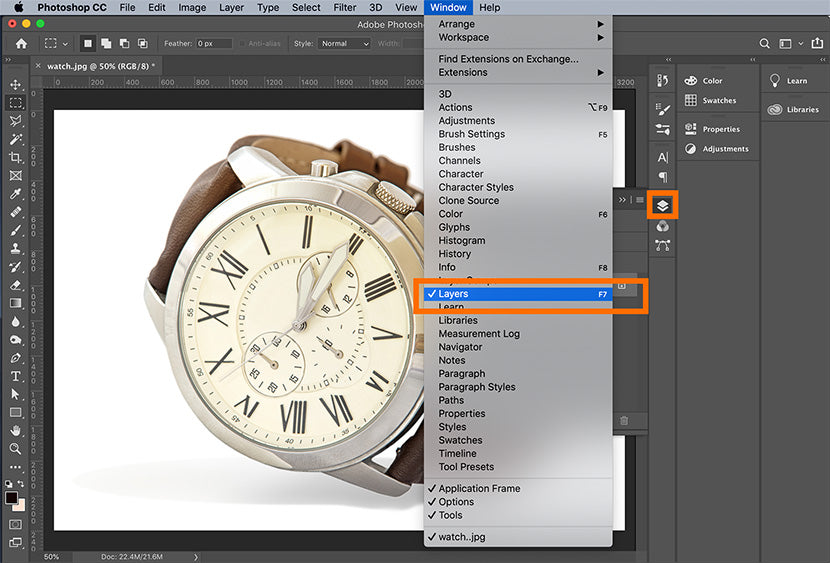
Open up your Layers panel. Past default, this console rests to the right of your prototype window, merely if you don't see it you tin access it by clicking on Window > Layers from the dropdown menu at the pinnacle of the application window.
In the Layers panel, double-click on the Background layer. A New Layer dialog box asking you to rename the layer will appear. You can leave this as the default Layer 0, and click OK.
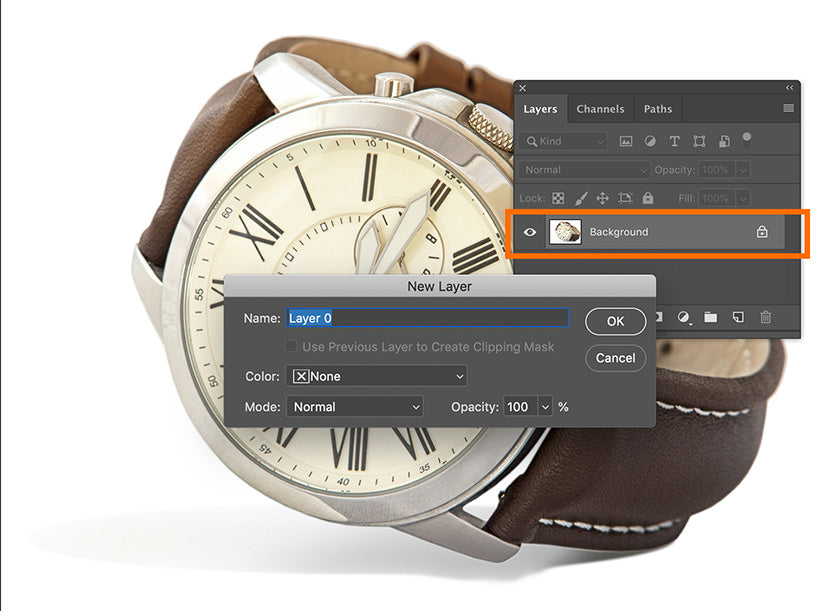
You've now unlocked your background layer, and anything you delete from it will be transparent.
Learn how to utilise layers in Photoshop with this tutorial
Step 2: Create your pick
Select the Magic Wand tool from the Toolbar on the left-hand side of the application window. Then, click on Select Subject field from the Options bar at the summit of the screen. Photoshop will attempt to select the object from your photograph, regardless of the background. You will see the pick equally "marching ants" surrounding the selection.
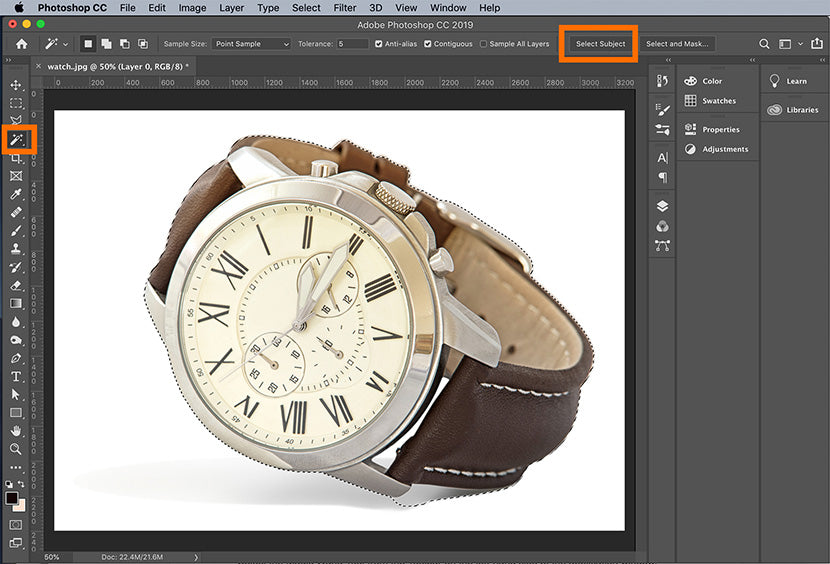
If the selection isn't perfect, you can use the Magic Wand tool to remove more of the background from the selection, or add more of the product to the option, depending on how the pick.
In this instance, Photoshop didn't completely remove the watch's shadow from the choice, so we'll choose the Subtract from option icon in the Options bar, and then click on portions of the shadow with the Magic Wand tool until the pick only contains the scout.
When you create your selection, make sure you besides select whatsoever areas where in that location are "holes" in your product prototype, as in the area where the watch face meets the wristband in the case image.

Footstep iii: Delete the background
Once yous have just your product selected, select the inverse by typing SHIFT+CTRL+I (SHIFT+COMMAND+I on a Mac), or by choosing Select > Inverse from the dropdown menu at the top of the application window.
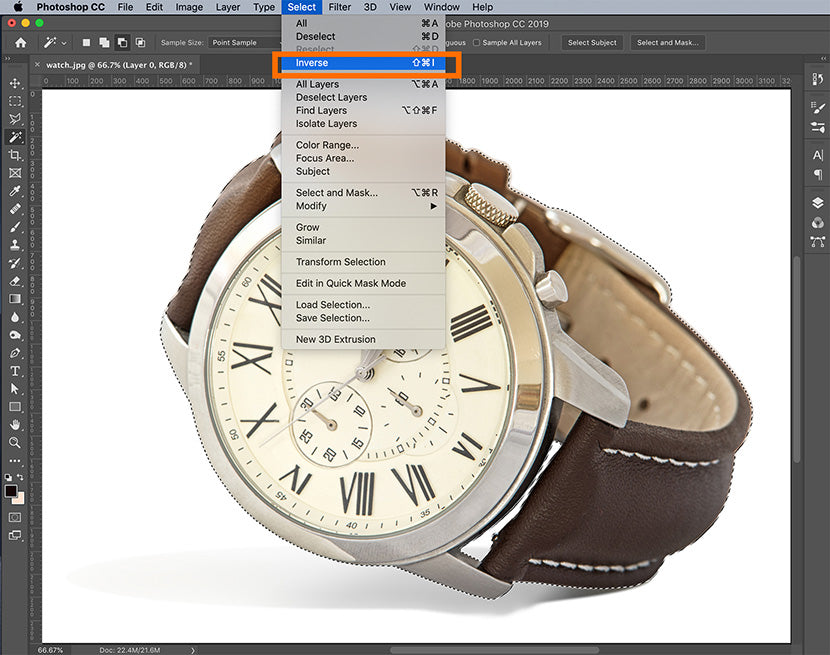
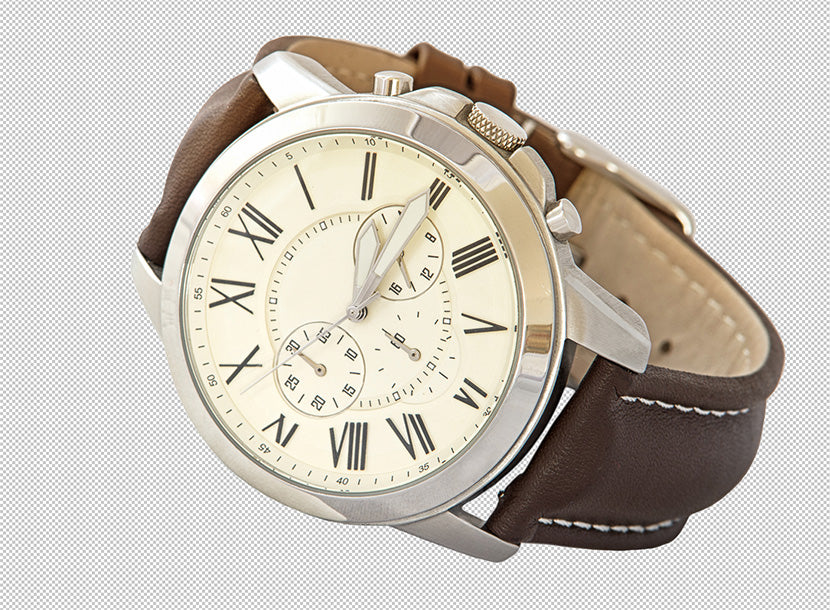
With your inverse (background) selected, type BACKSPACE (DELETE on a Mac). Your background volition now exist transparent. In Photoshop, a transparent background is represented with a grayness and white checkerboard design.
Blazon CTRL+D (COMMAND+D on a Mac) to deselect your choice.
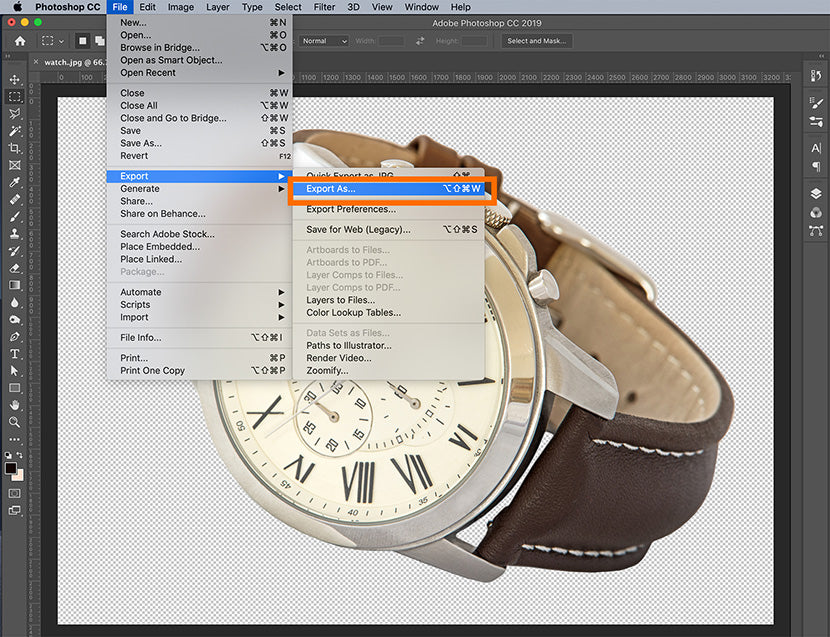
Step 4: Save your image in the proper spider web-ready format
Creating a transparent background in Photoshop is just the get-go step; you need to make sure you save your product epitome in the correct format in club for it to brandish with a transparent background on your ecommerce website.
The best format to salvage your image in is equally a PNG-24. This format allows for multiple layers of transparency, significant your image volition never accept a pixelated "halo" when placed on a different colour background. Older transparent file formats such as PNG-8 and GIF can create this undesirable halo issue, and so whenever possible, apply a PNG-24.
Observe out how to reformat, resize, and optimize your images for the web
To relieve your file as a PNG-24 in Photoshop CC, type SHIFT+ALT+CTRL+Westward (SHIFT+OPTION+COMMAND+Westward on a Mac) or choose File > Export > Export Equally… from the dropdown menu at the top of the application window.
Note: If you're using an older version of Photoshop, and y'all don't run into the Export As... option, you tin can choose Save for Web and select PNG-24 from the Preset dropdown menu on the right-hand side of the dialog box.
In the dialog box that appears, under File Settings on the right-hand side of the box, gear up the Format to PNG, and make certain the Transparency box is checked. Do non cheque Smaller File (eight-bit) — this converts the file to a PNG-8
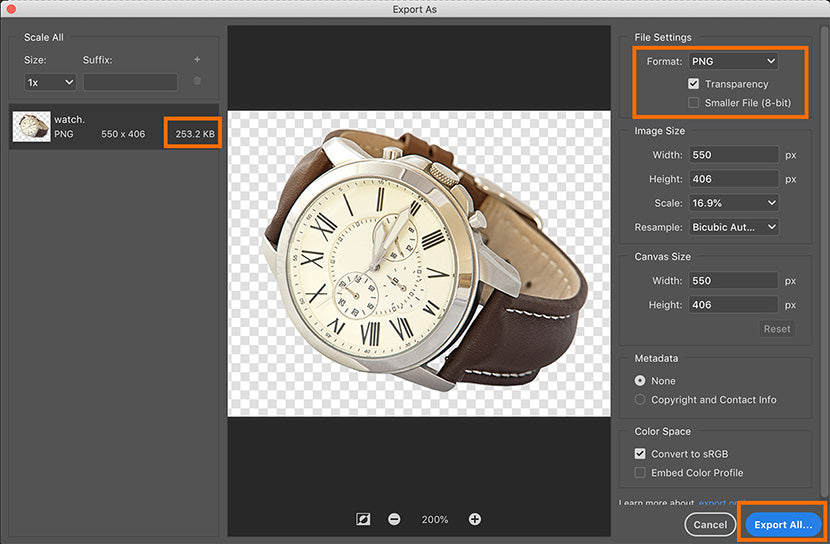
On the left-hand side of the image y'all'll see the file size predicted for your PNG file. This is important to proceed an eye on because larger file sizes will make your web page load more slowly. My personal preference is to keep spider web images at effectually 200 KB or smaller.
On the right-hand side of your dialog box, under Image Size, yous have the choice to adapt the dimensions of your image. Smaller dimensions hateful a smaller file size. All the same, yous don't want to make your image's dimensions smaller than you desire them to appear on your website; doing and so volition create blurry or pixelated images.
Also, with many of your customers viewing your product on a retina display, it'south adept exercise to save your production image at a size fifty%–100% larger than the size you lot expect information technology to display. This volition help it look well-baked on all devices. In other words, if you know your product volition testify at 400px wide at its maximum, yous'll want to make information technology at to the lowest degree 600px wide hither.
So, yep, there is a little fleck of balance you lot'll need to work with to maximize your image size while minimizing your file size. To minimize load time, you can cull but to accept your featured product images saved larger for retina displays, and permit the bulk of your production images to be saved at actual size.
Footstep 5: Save your file
Once yous've set your Epitome Size to proper dimensions, click Consign All.
In the Relieve dialog box, choose the folder where you keep your spider web-fix product images. Information technology'due south a good idea to go on your optimized image files separate from your original paradigm files to avoid defoliation when loading your images onto your site. Proper noun the image file and make sure its extension is prepare to .png.
Click Save.
Get digital asset management tips to organize your photos and maintain your sanity
You can now identify your transparent production image confronting different backgrounds on your site and accept it display perfectly.

How to create a transparent background for a logo in Photoshop
The logo that you utilise on your website should always have a transparent groundwork. That way, you accept the flexibility to display it anywhere on your site, no matter what color the groundwork of the folio is.
However, if your logo is saved as a JPG, you'll need to remove the background in Photoshop and resave your file as a PNG-24, just like nosotros did for the production image in the example above. If you're lucky enough to have a logo as a vector file (with extensions .AI, .EPS, or .PDF), you'll still need to open the file in Photoshop and convert it to a PNG-24 so information technology will be in a web-gear up format.
Learn how yous can outsource your raster to vector conversion needs
- Open your logo file in Photoshop
- Make your background transparent
- Save your image every bit a PNG file
Step 1: Open your logo file in Photoshop
In Photoshop, get to File > Open and navigate until y'all see your logo file. Click Open up.
If you're opening a .JPG (or other raster format) file, the file volition simply open in Photoshop.
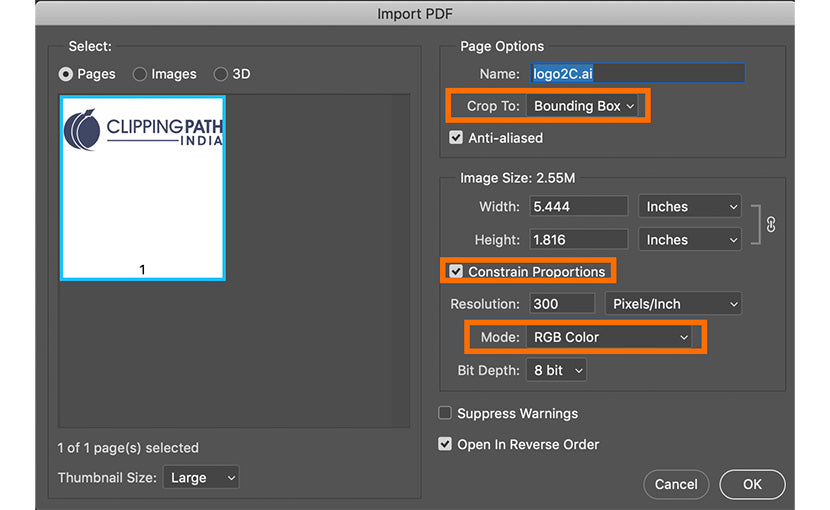
If you're opening a vector format file, however, yous'll need to make sure your settings are correct in the dialog box that appears:
- Crop To: is set to Bounding Box
- Constrain Proportions is checked
- Mode: is set to RGB Color
Click OK.
Footstep 2: Brand your background transparent
If you're working with a vector file, you lot tin can skip this stride. If you're working with a JPG, still, y'all will demand to select and delete the background from the image.
Like nosotros did in Step ane when we fabricated a product image background transparent above, y'all'll need to double-click the Background layer in the Layers panel and click OK to convert the Background to Layer 0.
Selecting the background of a logo file is slightly different from selecting the groundwork of a product image since the background of your logo is near likely all white. Choose the Magic Wand tool from the Toolbar and click on the white groundwork of your logo file. If you need to select multiple areas, agree downwards the SHIFT primal and click with the Magic Wand tool to add to the selection.

One time yous've selected the entire background, type BACKSPACE (DELETE on a Mac). You'll now have a transparent background, represented by a gray and white checkerboard pattern.

Step iii: Relieve your prototype as a PNG file in Photoshop
Follow Steps iv & 5 from where we made a product prototype transparent in a higher place to export your file equally a PNG-24. These steps are the same no matter what file format you started with, whether your original file was a JPG, AI, PDF, or other file format.
When you consign your epitome, y'all'll find that your file size is significantly lower than that of your transparent groundwork product prototype. This is because logos tend to have only ane or 2 colors, unlike the thousands of colors that exist in a product image. So you don't need to reduce your image proportions when you save your logo file. Keep your dimensions at the aforementioned size as the original file yous have been working with, and click Save.
Y'all now have the knowledge to create web-set images with transparent backgrounds that will display beautifully without slowing down your site.
Looking to learn more? Browse the rest of our Photoshop tutorials.


How To Save Background As Transparent In Photoshop,
Source: https://pathedits.com/blogs/tips/how-create-transparent-background-photoshop
Posted by: daviskniout.blogspot.com
0 Response to "How To Save Background As Transparent In Photoshop"
Post a Comment